Logging Made Easy in the Cloud
This page addresses some Frequently Asked Questions (FAQs) about deploying Logging Made Easy (LME) in the Cloud, including setup, firewall rules, and Cloud compatibility.
Table of Contents
- Does LME Run in the Cloud?
- Deploying LME in the Cloud for On-Premises Systems
- Debian Based Systems
- Red Hat/CentOS/RHEL Systems
- Deploying LME for Cloud Infrastructure
- Other Firewall Rules
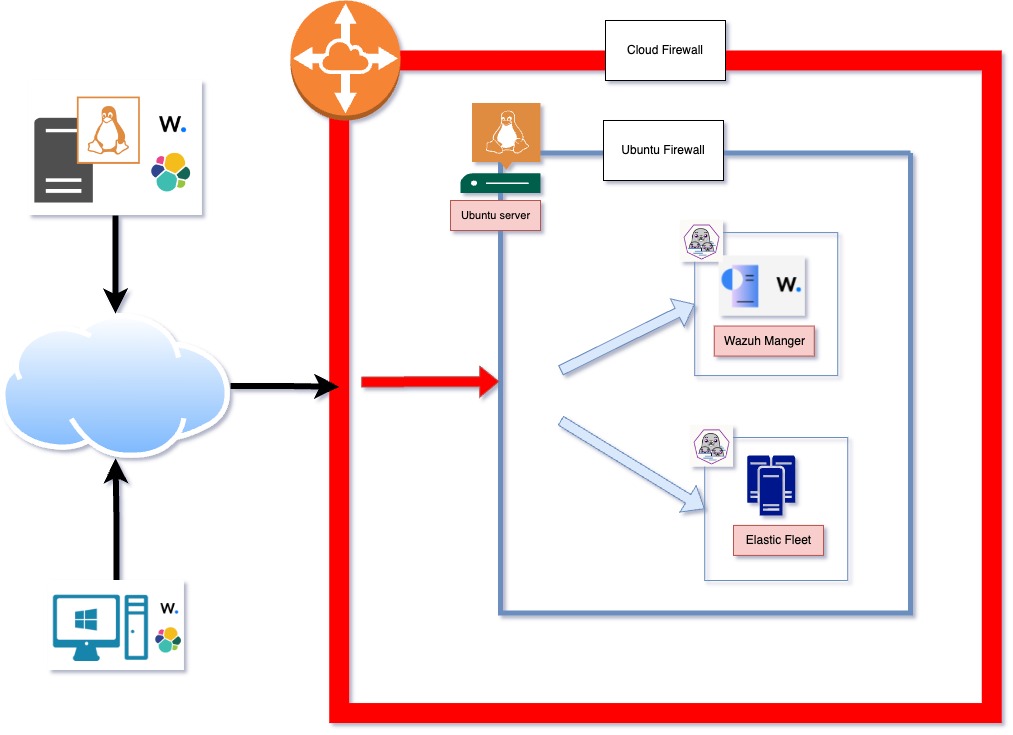
Does LME Run in the Cloud?
Yes. LME can run in the Cloud or on-premises environments. It’s designed to work in personal or Cloud deployments, allowing organizations to host LME in their Cloud tenant (e.g., Azure) or connect on-premises clients to a cloud-hosted instance.
Deploying LME in the Cloud for On-Premises Systems
You can set up LME in the Cloud and still send data from your on-premises endpoints. Here’s how it works:
You host the LME backend in the Cloud
Your Elastic agents (installed on your endpoints) send logs to it over the internet
Important: Ensure your firewall allows outbound traffic so your agents can connect.
The easiest way is to make sure you can access these LME server ports from the on-premise client:
Wazuh Agent (Agent Enrollment Requirements documentation): 1514,1515
Elastic Agent (Agent Install documentation): 8220 (fleet commands); 9200 (input to Elasticsearch)
You’ll need to ensure your Cloud firewall is set up to allow the ports above. On Azure, Network Security Groups (NSG) run a firewall on your virtual machine’s network interfaces. You’ll need to update your LME virtual machine’s rules to allow inbound connections on the agent ports. Azure has a detailed guide for how to add security rules here.
We highly suggest you do not open any port globally and restrict it based on your client’s IP address or your client’s subnets.
For Debian Based Systems
On LME, you’ll want to ensure that either:
The firewall is fully disabled (if you’re relying on your Cloud provider’s firewall as the primary layer of defense)
The necessary firewall rules are enabled to allow traffic through required ports
To check the firewall status, run:
lme-user@ubuntu:~$ sudo ufw status
Status: inactive
If Uncomplicated Firewall (UFW) is active, verify that the following rules are in place:
lme-user@ubuntu:~$ sudo ufw status
Status: inactive

To                         Action      From
--                         ------      ----
1514                       ALLOW       Anywhere
1515                       ALLOW       Anywhere
22                         ALLOW       Anywhere
8220                       ALLOW       Anywhere
1514 (v6)                  ALLOW       Anywhere (v6)
1515 (v6)                  ALLOW       Anywhere (v6)
22 (v6)                    ALLOW       Anywhere (v6)
8220 (v6)                  ALLOW       Anywhere (v6)
You can enable these ports via the following command:
sudo ufw allow 1514
sudo ufw allow 1515
sudo ufw allow 8220
sudo ufw allow 9200
If you plan to use the Wazuh Application Programming Interface (API), you’ll also need to allow port 55000:
sudo ufw allow 55000
To forward traffic to the container network and allow services to run properly, run:
ufw route allow in on eth0 out on podman1 to any port 443,1514,1515,5601,8220,9200 proto tcp
ufw route allow in on podman1
There’s also a helpful StackOverflow article on Configuring UFW for Podman on Port 443, if needed. Your podman1 network interface name may be different. Check the output of your network interfaces by running the following command to check if your interface is also called podman1:
sudo -i podman network inspect lme | jq 'map(select(.name == "lme")) | map(.network_interface) | .[]'
To view your applied rules:
root@ubuntu:~# ufw show added
Added user rules (see 'ufw status' for running firewall):
ufw allow 22
ufw allow 1514
ufw allow 1515
ufw allow 8220
ufw route allow in on eth0 out on podman1 to any port 443,1514,1515,5601,8220,9200 proto tcp
ufw allow 443
ufw allow in on podman1
ufw allow 9200
root@ubuntu:~#
For Red Hat/CentOS/RHEL Systems
⚠️ Important: Reboot May Be Required After Firewall Changes
After applying firewall configuration changes on any system, it is highly recommended to reboot the machine to ensure all networking and container rules take effect properly.
# After configuring firewall rules, reboot the system:
sudo reboot
This is especially important for:
- Container networking changes - ensures podman interfaces and bridge networks restart correctly
- Firewall rule persistence - confirms all permanent rules are properly loaded
- Network interface binding - ensures proper interface-to-zone assignments
- Service startup order - guarantees firewall, networking, and containers start in the correct sequence
RedHat-based systems offer two main firewall management approaches:
- firewalld (default) - higher-level management tool with zones and services
- nftables (direct) - lower-level control with better performance
Choose the approach that best fits your environment and expertise level.
Option 1: Using firewalld (Recommended for Most Users)
If you’re running LME on Red Hat-based systems, you’ll use firewalld instead of UFW for firewall management.
Important Note: In cloud environments like Azure, your cloud provider’s Network Security Group (NSG) often acts as the primary firewall layer. You may find that traffic is allowed even when the Red Hat firewall doesn’t have explicit rules, because the cloud NSG is handling the filtering.
⚠️ Important: LME Installation Behavior
During LME installation on RedHat systems, the firewall is automatically disabled to prevent container communication issues.
The LME ansible installation will stop and disable firewalld for you. If you later want to re-enable the firewall for security hardening, you can use one of the configuration methods below:
Automated Configuration (Recommended)
For the easiest setup, use our automated firewall configuration script (after LME install):
# Navigate to the LME directory
cd /path/to/LME
Run the automated firewall configuration script sudo ./scripts/configure_rhel_firewall.sh
$$ This script will: - Automatically detect your podman network interfaces and container subnets - Configure all necessary firewall rules for LME - Provide verification and troubleshooting information - Handle the complexity of dynamic interface names and network configurations$$Manual Configuration
For advanced users who need custom firewall configurations or troubleshooting, the automated script performs the equivalent of the following operations:
- Adds LME required ports (1514, 1515, 8220, 9200, 5601, 443) to the public zone
- Optionally adds Wazuh API port (55000) to the public zone
- Detects and configures container network subnets in the trusted zone
- Detects and configures podman interfaces in the trusted zone
- Enables masquerading for container traffic
- Reloads firewall configuration to apply changes
For manual configuration details, refer to the automated script source code at
./scripts/configure_rhel_firewall.shwhich contains all the necessary commands with proper error handling and network detection.
Troubleshooting Red Hat Firewall + Cloud Environment
If you’re experiencing connectivity issues:
Check your cloud provider’s security groups (e.g., Azure NSG, AWS Security Groups).
Verify which network layer is filtering traffic by running:
# Check if Red Hat firewall has the ports open
sudo firewall-cmd --zone=public --list-ports

# If ports are listed but still not accessible, check cloud NSG
# If ports are not listed, add them with the commands above
Test with firewall temporarily disabled by running:
# TEMPORARILY disable firewall for testing
sudo systemctl stop firewalld
# Test your connections
# Re-enable firewall
sudo systemctl start firewalld
Check firewall logs for blocked connections by running:
sudo journalctl -u firewalld | tail -20For defense in depth, configure both layers by running (cloud NSG + Red Hat firewall):
If problems persist, consider using the automated configuration script which handles edge cases and provides detailed troubleshooting information.
Option 2: Using nftables (Advanced Users)
For users who prefer direct nftables management or want better performance, LME includes a dedicated nftables configuration script that provides equivalent functionality to the firewalld approach.
When to Choose nftables over firewalld:
- Performance requirements - lower overhead and faster packet processing
- Direct control - fine-grained rule management without abstraction layers
- Existing nftables infrastructure - already using nftables in your environment
- Minimal overhead - prefer lightweight firewall management
- Advanced customization - need specific rule configurations not easily achieved with firewalld
Automated nftables Configuration (Recommended)
Use the automated nftables configuration script for the easiest setup:
# Navigate to the LME directory
cd /path/to/LME

# Run the nftables configuration script
sudo ./scripts/configure_lme_nftables.sh
This script will:
- Automatically detect your container networks and interfaces
- Prevent conflicts by optionally disabling firewalld
- Create persistent rules that survive reboots via
/etc/nftables.conf - Provide equivalent functionality to the firewalld configuration
- Include troubleshooting and verification capabilities
- Backup existing rules before making changes
What the Script Configures:
Input Rules (Public Access):
- Port 1514/tcp - Wazuh agent communication
- Port 1515/tcp - Wazuh agent enrollment
- Port 8220/tcp - Fleet server
- Port 9200/tcp - Elasticsearch
- Port 5601/tcp - Kibana
- Port 443/tcp - HTTPS
- Port 55000/tcp - Wazuh API (optional)
Container Network Rules:
- Allows all traffic from container subnets
- Permits communication on podman interfaces
- Enables container-to-container communication
NAT/Masquerading Rules:
- Masquerades container traffic for external access
- Handles traffic forwarding between container and host networks
Manual nftables Configuration
For advanced users who need custom nftables configurations, the automated script creates comprehensive rules that can be reviewed and customized in /etc/nftables/lme.nft.
For manual configuration details, reference the automated script source code at ./scripts/configure_lme_nftables.sh which generates all necessary nftables rules with proper network detection and persistence configuration.
Verifying nftables Configuration by running:
# Check if nftables rules are loaded
sudo nft list ruleset

# View LME-specific tables
sudo nft list table inet lme_filter
sudo nft list table ip lme_nat

# Test container communication
sudo -i podman exec lme-kibana curl -s http://lme-elasticsearch:9200/_cluster/health
Troubleshooting nftables Setup:
Check rule application by running:
sudo nft list ruleset | grep -A 5 -B 5 lmeMonitor dropped packets by running:
sudo journalctl -f | grep LME_DROPPEDTest with rules temporarily disabled by running:
# Backup current rules
sudo nft list ruleset > /tmp/nft_backup.nft

# Remove LME tables for testing
sudo nft delete table inet lme_filter
sudo nft delete table ip lme_nat

# Test connectivity
# Restore rules
sudo nft -f /etc/nftables/lme.nft
Verify service startup by running:
sudo systemctl status nftables
sudo systemctl enable nftables
Important Notes for nftables Users:
- firewalld conflicts - the script can optionally disable firewalld to prevent rule conflicts
- Persistence - rules are automatically added to
/etc/nftables.conffor persistence across reboots - Cloud compatibility - works with cloud provider firewalls (NSGs, Security Groups) as an additional layer
- Container networking - automatically detects and configures container subnets and interfaces
Summary: Choosing Your Red Hat Firewall Approach
| Aspect | firewalld | nftables |
|---|---|---|
| Ease of Use | ✅ Beginner-friendly | ⚠️ Advanced users |
| Performance | Good | ✅ Better (lower overhead) |
| Management | Zone-based, abstracted | Direct rule control |
| Default on RHEL | ✅ Yes | Available |
| LME Compatibility | ✅ Fully supported | ✅ Fully supported |
| Cloud Environment | ✅ Works with NSGs | ✅ Works with NSGs |
| Automation Script | configure_rhel_firewall.sh | configure_lme_nftables.sh |
Recommendation:
- New to firewall management? Use firewalld (Option 1)
- Performance critical environment? Use nftables (Option 2)
- Existing nftables setup? Use nftables (Option 2)
- Default choice for most users: firewalld (Option 1)
Both approaches provide identical security and functionality for LME; select based on your preference and requirements.
Deploying LME for Cloud Infrastructure
Every Cloud setup is different. As long as the LME server is on the same network and able to talk to the machines you want to monitor, your deployment should run smoothly.
Other Firewall Rules
You may also want to access Kibana from outside the Cloud as well. You’ll want to ensure you either allow port 5601 or port 443 inbound from the Cloud firewall and the virtual machine firewall.
To allow port 443, run the following:
root@ubuntu:/opt/lme# sudo ufw allow 443
Rule added
Rule added (v6)
Sample firewall status (active):
root@ubuntu:/opt/lme# sudo ufw status
Status: active

To                         Action      From
--                         ------      ----
22                         ALLOW       Anywhere
1514                       ALLOW       Anywhere
1515                       ALLOW       Anywhere
8220                       ALLOW       Anywhere
443                        ALLOW       Anywhere
22 (v6)                    ALLOW       Anywhere (v6)
1514 (v6)                  ALLOW       Anywhere (v6)
1515 (v6)                  ALLOW       Anywhere (v6)
8220 (v6)                  ALLOW       Anywhere (v6)
443 (v6)                   ALLOW       Anywhere (v6)
Don’t Lock Yourself Out and Enable the Firewall
Before enabling the firewall, ensure you’re not blocking your Secure Shell (SSH) access. You must allow port 22 so you can still connect remotely by running:
sudo ufw allow 22
Once all necessary ports are allowed, enable the firewall by running:
sudo ufw enable